week 5: 10/13/06
Class, Once again, please forgive me for not posting this earlier. Since I'd only decided to do this blog after week 4 of the term for this class and for all of my other classes, I'm not only trying to keep up with the week-to-week postings, i'm also trying to play catch-up. So please try to bear with me for the next week or so; after which, I should be able to post each class by the Saturday or Sunday immediately following it.
Also, I'd like to apologize for letting class out early last week (although I am sure most of you don't mind leaving school a little earlier than usual on a Friday evening), as well as dashing out so suddenly as I did, even before the rest of you did. Believe it or not, I went to see the premiere of the new film, "Marie Antoinette" at the NY Film Festival. I'm not much of a star-hunter, or celebrity-hound, but it's nonetheless always fun to see famous people. Kirsten Dunst was there, as well as Jason Schwartzman and Sofia Coppola (the director), among others. But shhhh!...it's just our secret.
What you have below is our last class (week 5, Friday, October 13th). We will continue this week with where we left off last weeks' class, so please make sure to bring all your files from last week.
As always, please locate me at school, or email me if you have any questions. See you Friday, Carter-
INTRODUCE:
Also, I'd like to apologize for letting class out early last week (although I am sure most of you don't mind leaving school a little earlier than usual on a Friday evening), as well as dashing out so suddenly as I did, even before the rest of you did. Believe it or not, I went to see the premiere of the new film, "Marie Antoinette" at the NY Film Festival. I'm not much of a star-hunter, or celebrity-hound, but it's nonetheless always fun to see famous people. Kirsten Dunst was there, as well as Jason Schwartzman and Sofia Coppola (the director), among others. But shhhh!...it's just our secret.
What you have below is our last class (week 5, Friday, October 13th). We will continue this week with where we left off last weeks' class, so please make sure to bring all your files from last week.
As always, please locate me at school, or email me if you have any questions. See you Friday, Carter-
- TOPICS:
- LINK Reviewing HTML Forms,
- LINK Reviewing some CSS,
- LINK Using the getElementById() function,
- LINK Event Handlers: 'Calling' or activating a user-defined function with something other than a link,
- LINK Reviewing HTML Forms,
- HOMEWORK—I will check the previous week's homework (shown this week again below), as well as what was due this week:
- Last Weeks' Homework: Using Notepad (or TextEdit with a Mac), please type an .html document with a script that creates a user-defined function that does the following:
- First, requests the user's name;
- Second, requests a number from the user;
- Third, requests a 2nd number from the user;
- Fourth, determines whether the 1st number is greater than, less than, or equal to the 2nd number using conditional statements (IF/ELSE);
- And then, that finally tells the user (using his/her name) which one it is via an alert() function.
Click Here to see example:
- First, requests the user's name;
- This Week's Homework: Using the files that we began with last Friday, please make sure that your script functions up to the point that we brought it by the end of class. Use this week's posting here to help guide you through understanding what we began with, as well as how to begin clearing up any bugs in your script that you might have.
- REVIEW: Last semester, in DMA110, you were introduced to XHTML and CSS. Below is a brief review of a few important elements of each:
The best-looking, most functional, and clearest FORMS are those that use TABLES for layout purposes. Examine the code below. Notice there are four (4) rows, and that rows 2 and 4 have form elements:
- HTML Forms & Tables—
<form id="myForm">
<table border="0px" width="100&pct;">
1 <tr>
<td colspan="5"> </td>
</tr>2 <tr>
<td> </td>
<td>homework:</td>
<td> </td>
<td>
<input type="text" id="hw"/>
</td>
<td> </td>
</tr>3 <tr>
<td colspan="5"> </td>
</tr>4 <tr></table>
<td colspan="3"> </td>
<td>
<input type="button" id="myButton" value="send" onclick="writeText()"/>
</td>
</tr>
</form>
Notice that above the four (4) rows of the table and how they organize and lay-out the form. Now, compare to the table below without the borders.
You should recognize that the table elements are aligned with each other. Such alignment adds a sense of organization, clarity, and coherence to any design, with only greater effects when using more form elements. In addition, you should also notice that each of the form elements, as well as the form itself, has an ID. These will be important when adding the CSS and JavaScript.
Using the same basic layout set by the table, seven (7) more form elements may be added:
- CSS—
The best method to further the design of a form such as this is to use CSS. Since we have begun the layout and design process with the assistance of tables to aid in alignment and organization, CSS can be used to advance our aims to create a pleasing design to a much higher degree of control.
- There are many ways to design using CSS. It is very individual and personal the way you proceed, but first I would like to simply set the background color for the page:
<style type="text/css">
<!--
body {background-color:#99aacc;}
//-->
</style>
- Next, I want to create a CSS CLASS which, when applied, will design the font and set the text-alignment for certain cells. I will call this class "formLabel":
<style type="text/css">
<!--
body {background-color:#99aacc;}
.formLabel {font-family:Gill Sans,
Arial, sans serif;
font-size:14pt;
font-weight:bold;
color:#336699;
text-align:right;
line-height:10pt;}
//-->
</style>
This class should be applied to only the <td> tags which have text, like so:
<td class="formLabel">homework:</td>
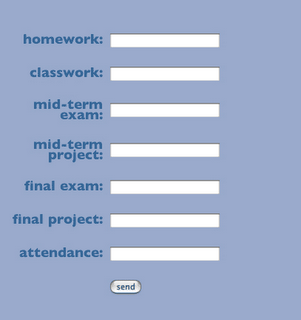
If applied to all the <td> tags with text (homework, classwork, mid-term exam, mid-term project, final exam, final project, and attendance), then the table will look similar to the image that follows.
- If we next create a layer using an CSS ID, then we can apply it to the table and form below, which will enable us to position it where we like, as well as control many aspects of its appearance.
But first, let us establish the layer properties: it's width & height, it's position on the page with the top & width & position properties, and it's stacking order with the zIndex property.
<style type="text/css">
<!--
body {background-color:#99aacc;}
.formLabel {font-family:Gill Sans,
Arial, sans serif;
font-size:14pt;
font-weight:bold;
color:#336699;
text-align:right;
line-height:10pt;}
#layerOne {width:300px;
height:300px;
top:50px;
left:200px;
position:absolute;
zIndex:1;}
//-->
</style>
- After doing this, you must type a pair of <div> tags around the the <form> tags, and then apply the ID to the first one, like so:
<div id="layerOne">
</div>
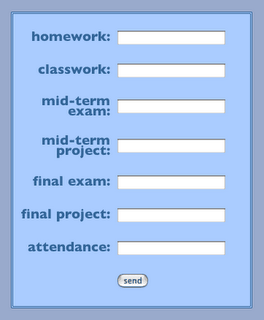
- As a result, the form and table should move down and to the left some. If so, then we may then apply the styling we wish to the layer with border-style, border-width, border-color, and the background-color properties.
#layerOne {width:325px;
height:400px;
top:50px;
left:200px;
position:absolute;
zIndex:1;
border-style:double;
border-width:3px;
border-color:#336699;
background-color:#aaccff;}
//-->
</style>
All of this produces the following table when saved and refreshed:
- If we next create a layer using an CSS ID, then we can apply it to the table and form below, which will enable us to position it where we like, as well as control many aspects of its appearance.
- Last Weeks' Homework: Using Notepad (or TextEdit with a Mac), please type an .html document with a script that creates a user-defined function that does the following:
- document.getElementById()—This is a JavaScript built-in function that searches throughout an HTML document for an HTML tag with a particular ID. Once located, this function selects the ID which will enable the script to manipulate it in some way. For example, if there is an ID by the name of "homework", the document.getElementById function may select it in this way:
document.getElementById("homework").
The script will activate the "homework" ID and thereby will be able to manipulate it. If it is an H1 tag or a H2 tag or a P tag, it may change the color of the text, or the size or various other properties. If it is a form element, it may be able to extract the data from it. It does so in this way: document.getElementById("homework").value, where value is whatever is typed in the blank of that particular form element.
In the form we have typed, we have seven (7) form elements. We are able to extract whatever data the user types in those seven blanks with this new function. Below I create seven new variables, and then use the document.getElementById() function to move the data from the form elements into the variables. Finally, all is revealed with a series of alert() functions.
<script language="javascript" type="text/javascript">
<!--
function writeText()
{
var red = document.getElementById("hw").value;
var orange = document.getElementById("cw").value;
var yellow = document.getElementById("mtE").value;
var green = document.getElementById("mtP").value;
var aqua = document.getElementById("fE").value;
var blue = document.getElementById("fP").value;
var purple = document.getElementById("att").value;
alert(red);
alert(orange);
alert(yellow);
alert(green);
alert(aqua);
alert(blue);
alert(purple);
}
//-->
</script>
- Event Handlers—In JavaScript there are a series of terms that cause things to happen, much like built-in functions; however, unlike them, they make things occur as a result of certain 'computer events'. These events are peculiar to computers, events such as loading a browser window or web-page, or closing a web-page or browser window, such as clicking with the mouse or moving the cursor with the mouse. These are all events which occur in a computer environment. Event handlers use these events to cause other things to occur, such as making something appear or disappear when you click on a button with a mouse. The click of the mouse is the event that the event handlers handle. The appearance of a pop-down menu when you click on the mouse is the action that the event handlers cause to occur. Some common event handers are: onLoad, onUnload, onmouseOver, onmouseOut, onClick, etc.
Like the <a> anchor tag, event handlers can be used to call or activate user-defined functions. We can use an event handler to activate our function above with the submit button in our form. We do this in the <input/> tag itself:
<tr>
<td colspan="3"> </td>
<td>
<input type="button" id="myButton" value="send" onclick="writeText()"/>
</td>
<td> </td>
</tr>


0 Comments:
Post a Comment
<< Home