Summer 2007
week 5: 6/15
hi everybody, i hope you've not forgotten that we have a blog for this class because it seems that i sure did. strange that no one saw fit to remind me of this fact before tonight.
hmmmm...THANKS MOSI!! <---there's your reward.
anyways, here's what we did in the last class down below. although this is only the day before our class, i'm sure that the homework won't be too much for you all.
carter-
hmmmm...THANKS MOSI!! <---there's your reward.
anyways, here's what we did in the last class down below. although this is only the day before our class, i'm sure that the homework won't be too much for you all.
carter-
- TOPICS:
- LINK Reviewing HTML Forms,
- LINK Reviewing some CSS,
- LINK Using the getElementById() function,
- LINK Event Handlers: 'Calling' or activating a user-defined function with something other than a link,
- LINK Reviewing HTML Forms,
- HOMEWORK:
- Using the files that we began with last Friday, please make sure that your script functions up to the point that we brought it by the end of class. Use this week's posting here to help guide you through understanding what we began with, as well as how to begin clearing up any bugs in your script that you might have. Remember, Mozilla Firefox will assist you to a much higher degree than many other browsers, namely Internet Explorer. There may be minor differences here from waht we did in class, but they are essentially the same.
- Using more CSS, among other items, create another LAYER with the following criteria:
- It should be exactly the same size as the first layer;
- It should be exactly the same shape as the first layer;
- It should be positioned directly to the right of the first layer;
- The top and bottom edges of this new layer should be directly aligned with the first layer;
- In this layer, there will be no visible content.
- It should be exactly the same size as the first layer;
- Instead of an alert() function, make the results of the script output into a document.write() method.
- Create six tiny images with the following properties:
- Each one is one pixel by one pixel in size.
- Each one is set to 72ppi.
- Each one has a different background color—red, orange, yellow, green, blue, purple.
- Save all these little images in an images folder inside the main folder of last week's script.
- Each one is one pixel by one pixel in size.
- Using the files that we began with last Friday, please make sure that your script functions up to the point that we brought it by the end of class. Use this week's posting here to help guide you through understanding what we began with, as well as how to begin clearing up any bugs in your script that you might have. Remember, Mozilla Firefox will assist you to a much higher degree than many other browsers, namely Internet Explorer. There may be minor differences here from waht we did in class, but they are essentially the same.
- REVIEW: Last semester, in DMA110, you were introduced to XHTML and CSS. Below is a brief review of a few important elements of each:
- HTML Forms & Tables—The best-looking, most functional, and clearest FORMS are those that use TABLES for layout purposes. Examine the code below. Notice there are four (4) rows, and that rows 2 and 4 have form elements:
<form id="myForm">
<table border="0px" width="100&pct;">
1 <tr>
<td colspan="5"> </td>
</tr>2 <tr>
<td> </td>
<td>homework:</td>
<td> </td>
<td>
<input type="text" id="hw"/>
</td>
<td> </td>
</tr>3 <tr>
<td colspan="5"> </td>
</tr>4 <tr></table>
<td colspan="3"> </td>
<td>
<input type="button" id="myButton" value="send" onclick="writeText()"/>
</td>
</tr>
</form>
Notice that above the four (4) rows of the table and how they organize and lay-out the form. Now, compare to the table below without the borders.
You should recognize that the table elements are aligned with each other. Such alignment adds a sense of organization, clarity, and coherence to any design, with only greater effects when using more form elements. In addition, you should also notice that each of the form elements, as well as the form itself, has an ID. These will be important when adding the CSS and JavaScript.
Using the same basic layout set by the table, seven (7) more form elements may be added: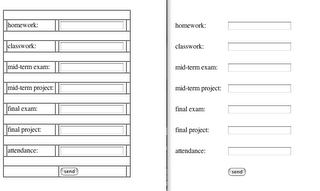
- CSS—
The best method to further the design of a form such as this is to use CSS. Since we have begun the layout and design process with the assistance of tables to aid in alignment and organization, CSS can be used to advance our aims to create a pleasing design to a much higher degree of control.
- There are many ways to design using CSS. It is very individual and personal the way you proceed, but first I would like to simply set the background color for the page:
<style type="text/css">
<!--
body {background-color:#99aacc;}
//-->
</style>
- Next, I want to create a CSS CLASS which, when applied, will design the font and set the text-alignment for certain cells. I will call this class "formLabel":
<style type="text/css">
<!--
body {background-color:#99aacc;}
.formLabel {font-family:Gill Sans,
Arial, sans serif;
font-size:14pt;
font-weight:bold;
color:#336699;
text-align:right;
line-height:10pt;}
//-->
</style>
This class should be applied to only the <td> tags which have text, like so:
<td class="formLabel">homework:</td>
If applied to all the <td> tags with text (homework, classwork, mid-term exam, mid-term project, final exam, final project, and attendance), then the table will look similar to the image that follows.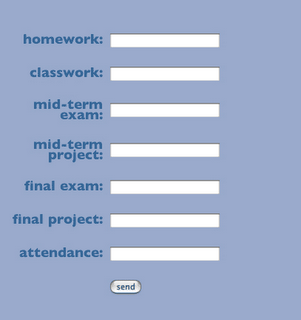
- If we next create a layer using an CSS ID, then we can apply it to the table and form below, which will enable us to position it where we like, as well as control many aspects of its appearance.
But first, let us establish the layer properties: it's width & height, it's position on the page with the top & width & position properties, and it's stacking order with the zIndex property.
<style type="text/css">
<!--
body {background-color:#99aacc;}
.formLabel {font-family:Gill Sans,
Arial, sans serif;
font-size:14pt;
font-weight:bold;
color:#336699;
text-align:right;
line-height:10pt;}
#layerOne {width:300px;
height:300px;
top:50px;
left:200px;
position:absolute;
zIndex:1;}
//-->
</style>
- After doing this, you must type a pair of <div> tags around the the <form> tags, and then apply the ID to the first one, like so:
<div id="layerOne">
</div>
- As a result, the form and table should move down and to the left some. If so, then we may then apply the styling we wish to the layer with border-style, border-width, border-color, and the background-color properties.
#layerOne {width:325px;
height:400px;
top:50px;
left:200px;
position:absolute;
zIndex:1;
border-style:double;
border-width:3px;
border-color:#336699;
background-color:#aaccff;}
//-->
</style>
All of this produces the following table when saved and refreshed: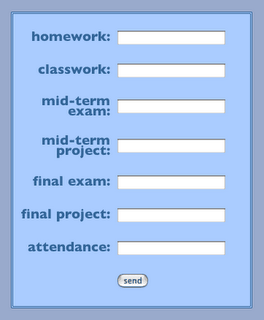
- If we next create a layer using an CSS ID, then we can apply it to the table and form below, which will enable us to position it where we like, as well as control many aspects of its appearance.
- HTML Forms & Tables—The best-looking, most functional, and clearest FORMS are those that use TABLES for layout purposes. Examine the code below. Notice there are four (4) rows, and that rows 2 and 4 have form elements:
- INTRODUCE:
- document.getElementById()—This is a JavaScript built-in function that searches throughout an HTML document for an HTML tag with a particular ID. Once located, this function selects the ID which will enable the script to manipulate it in some way. For example, if there is an ID by the name of "homework", the document.getElementById function may select it in this way:
document.getElementById("homework").
The script will activate the "homework" ID and thereby will be able to manipulate it. If it is an H1 tag or a H2 tag or a P tag, it may change the color of the text, or the size or various other properties. If it is a form element, it may be able to extract the data from it. It does so in this way: document.getElementById("homework").value, where value is whatever is typed in the blank of that particular form element.
In the form we have typed, we have seven (7) form elements. We are able to extract whatever data the user types in those seven blanks with this new function. Below I create seven new variables, and then use the document.getElementById() function to move the data from the form elements into the variables. Finally, all is revealed with a series of alert() functions.
<script language="javascript" type="text/javascript">
<!--
function writeText()
{
var red = document.getElementById("hw").value;
var orange = document.getElementById("cw").value;
var yellow = document.getElementById("mtE").value;
var green = document.getElementById("mtP").value;
var aqua = document.getElementById("fE").value;
var blue = document.getElementById("fP").value;
var purple = document.getElementById("att").value;
alert(red);
alert(orange);
alert(yellow);
alert(green);
alert(aqua);
alert(blue);
alert(purple);
}
//-->
</script>
- Event Handlers—In JavaScript there are a series of terms that cause things to happen, much like built-in functions; however, unlike them, they make things occur as a result of certain 'computer events'. These events are peculiar to computers, events such as loading a browser window or web-page, or closing a web-page or browser window, such as clicking with the mouse or moving the cursor with the mouse. These are all events which occur in a computer environment. Event handlers use these events to cause other things to occur, such as making something appear or disappear when you click on a button with a mouse. The click of the mouse is the event that the event handlers handle. The appearance of a pop-down menu when you click on the mouse is the action that the event handlers cause to occur. Some common event handers are: onLoad, onUnload, onmouseOver, onmouseOut, onClick, etc.
Like the <a> anchor tag, event handlers can be used to call or activate user-defined functions. We can use an event handler to activate our function above with the submit button in our form. We do this in the <input/> tag itself:
<tr>
<td colspan="3"> </td>
<td>
<input type="button" id="myButton" value="send" onclick="writeText()"/>
</td>
<td> </td>
</tr>
- document.getElementById()—This is a JavaScript built-in function that searches throughout an HTML document for an HTML tag with a particular ID. Once located, this function selects the ID which will enable the script to manipulate it in some way. For example, if there is an ID by the name of "homework", the document.getElementById function may select it in this way:


posted by carter at 3:11 PM
![]()


1 Comments:
You're welcome Carter! This is why I'm here!
Post a Comment
<< Home